
URLDNS_学习笔记
写在前面
现在正式开始进行反序列化了,想要学习就应该先了解序列化和反序列化
知识预备
序列化是为了将对象进行长期存储而诞生的方法,那么反序列化就是将存储的序列化内容恢复成对象。亦或是把对象转换成二进制的字符串,又把二进制的字符串转换成对象。
如何才能实现序列化和反序列化了?
在 Java 的类中,必须要实现 java.io.Serializable 或 java.io.Externalizable 接口才可以使用,而实际上 Externalizable 也是实现了 Serializable 接口。
Java 提供了两个类 java.io.ObjectOutputStream 和 java.io.ObjectInputStream 来实现序列化和反序列化的功能,其中 ObjectInputStream 用于恢复那些已经被序列化的对象,ObjectOutputStream 将 Java 对象的原始数据类型和图形写入 OutputStream。
- Java允许开发者对
readObject进行功能的补充,所以在反序列化过程中如果开发者重写了readObject方法那么Java会优先使用这个重写的方法,所以如果开发者书写不当的话就会导致命令执行
这里直接引用su18的两个流的总结:
ObjectOutputStream

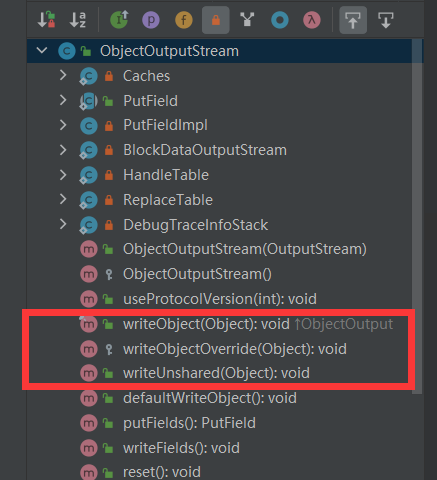
ObjectOutputStream 继承的父类或实现的接口如下:
- 父类 OutputStream:所有字节输出流的顶级父类,用来接收输出的字节并发送到某些接收器(sink)。
- 接口 ObjectOutput:ObjectOutput 扩展了 DataOutput 接口,DataOutput 接口提供了将数据从任何 Java 基本类型转换为字节序列并写入二进制流的功能,ObjectOutput 在 DataOutput 接口基础上提供了
writeObject方法,也就是类(Object)的写入。 - 接口 ObjectStreamConstants:定义了一些在对象序列化时写入的常量。常见的一些的比如
STREAM_MAGIC、STREAM_VERSION等。
通过这个类的父类及父接口,我们大概可以理解这个类提供的功能:能将 Java 中的类、数组、基本数据类型等对象转换为可输出的字节,也就是反序列化。接下来看一下这个类中几个关键方法。
writeObject
这是 ObjectOutputStream 对象的核心方法之一,用来将一个对象写入输出流中,任何对象,包括字符串和数组,都是用 writeObject 写入到流中的。
之前说过,序列化的过程,就是将一个对象当前的状态描述为字节序列的过程,也就是 Object -> OutputStream 的过程,这个过程由 writeObject 实现。writeObject 方法负责为指定的类编写其对象的状态,以便在后面可以使用与之对应 readObject 方法来恢复它。
writeUnshared
用于将非共享对象写入 ObjectOutputStream,并将给定的对象作为刷新对象写入流中。
使用 writeUnshared 方法会使用 BlockDataOutputStream 的新实例进行序列化操作,不会使用原来 OutputStream 的引用对象。
writeObject0
writeObject 和 writeUnshared 实际上调用 writeObject0 方法,也就是说 writeObject0是上面两个方法的基础实现。具体的实现流程将会在后面再进行详细研究。
writeObjectOverride
如果 ObjectOutputStream 中的 enableOverride 属性为 true,writeObject 方法将会调用 writeObjectOverride,这个方法是由 ObjectOutputStream 的子类实现的。
在由完全重新实现 ObjectOutputStream 的子类完成序列化功能时,将会调用实现类的 writeObjectOverride 方法进行处理。
ObjectInputStream
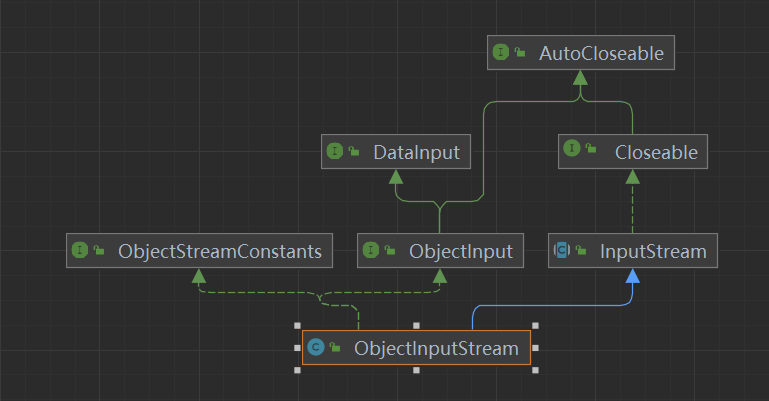

ObjectInputStream 继承的父类或实现的接口如下:
- 父类 InputStream:所有字节输入流的顶级父类。
- 接口 ObjectInput:ObjectInput 扩展了 DataInput 接口,DataInput 接口提供了从二进制流读取字节并将其重新转换为 Java 基础类型的功能,ObjectInput 额外提供了
readObject方法用来读取类。 - 接口 ObjectStreamConstants:同上。
ObjectInputStream 实现了反序列化功能,看一下其中的关键方法。
readObject
从 ObjectInputStream 读取一个对象,将会读取对象的类、类的签名、类的非 transient 和非 static 字段的值,以及其所有父类类型。
我们可以使用 writeObject 和 readObject 方法为一个类重写默认的反序列化执行方,所以其中 readObject 方法会 “传递性” 的执行,也就是说,在反序列化过程中,会调用反序列化类的 readObject 方法,以完整的重新生成这个类的对象。
readUnshared
从 ObjectInputStream 读取一个非共享对象。 此方法与 readObject 类似,不同点在于readUnshared 不允许后续的 readObject 和 readUnshared 调用引用这次调用反序列化得到的对象。
readObject0
readObject 和 readUnshared 实际上调用 readObject0 方法,readObject0是上面两个方法的基础实现。
readObjectOverride
由 ObjectInputStream 子类调用,与 writeObjectOverride 一致。
通过上面对 ObjectOutputStream 和 ObjectInputStream 的了解,两个类的实现几乎是一种对称的、双生的方式进行。
测试案例
前面讲到,如果被序列化的类重写了 writeObject 和 readObject 方法,Java 将会委托使用这两个方法来进行序列化和反序列化的操作。
正是因为这个特性,导致反序列化漏洞的出现:在反序列化一个类时,如果其重写了 readObject 方法,程序将会调用它,如果这个方法中存在一些恶意的调用,则会对应用程序造成危害。
1 | import java.io.*; |
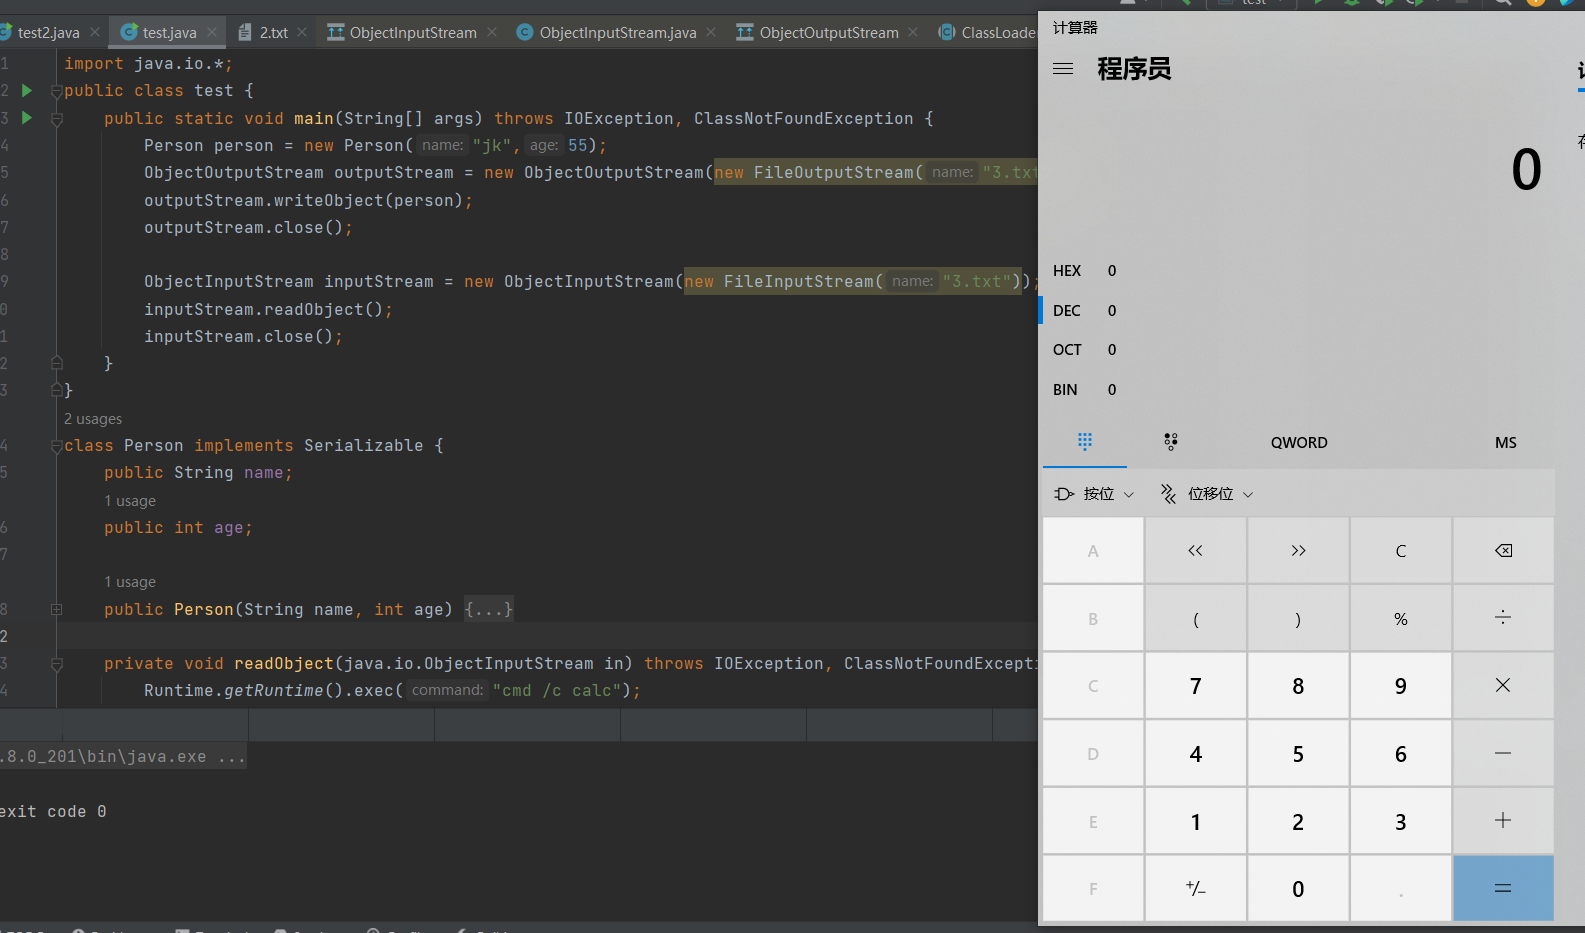
弹出来可怕的calc
分析:
因为我们在Person类中重写了readObject方法,所以在 inputStream.readObject(); 反序列化中不是调用的不是ObjectInputStream的方法,而是使用了我们在Person类中重写的方法,所以执行了cmd /c calc
为什么会重写了就执行我们的方法了?让我们一起跟着su18的分析来学习一下吧
跟进java.io.ObjectInputStream#readObject() 方法的具体实现代码,readObject 方法实际调用 readObject0 方法反序列化字符串。
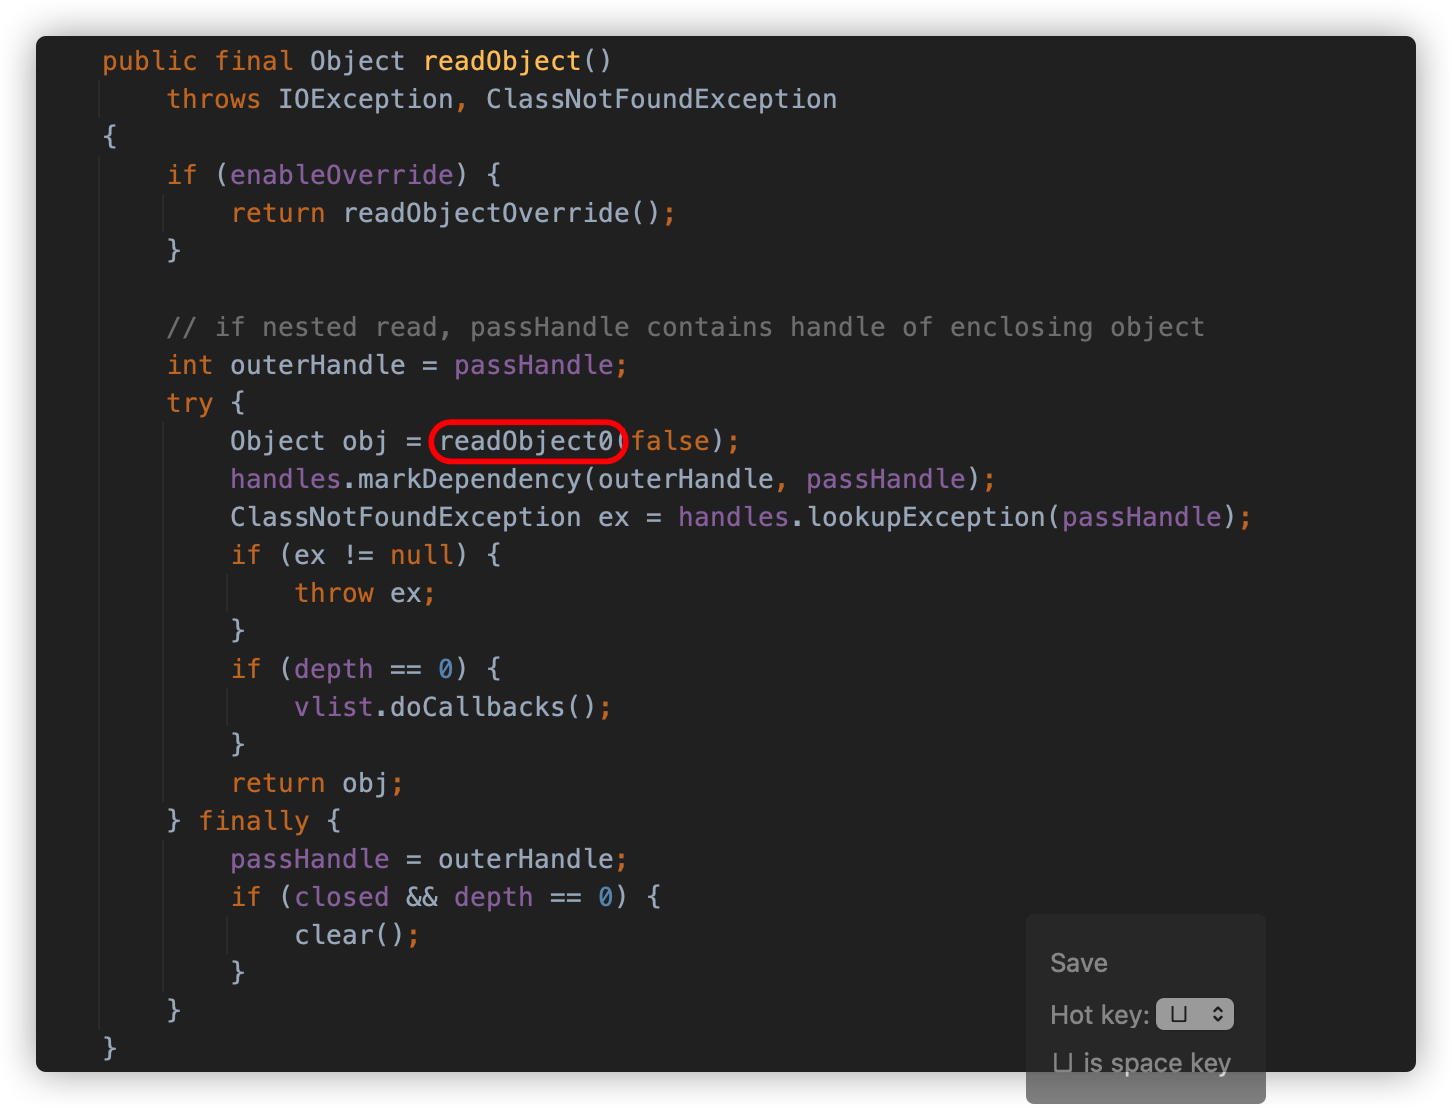
readObject0 方法以字节的方式去读,如果读到 0x73,则代表这是一个对象的序列化数据,将会调用 readOrdinaryObject 方法进行处理
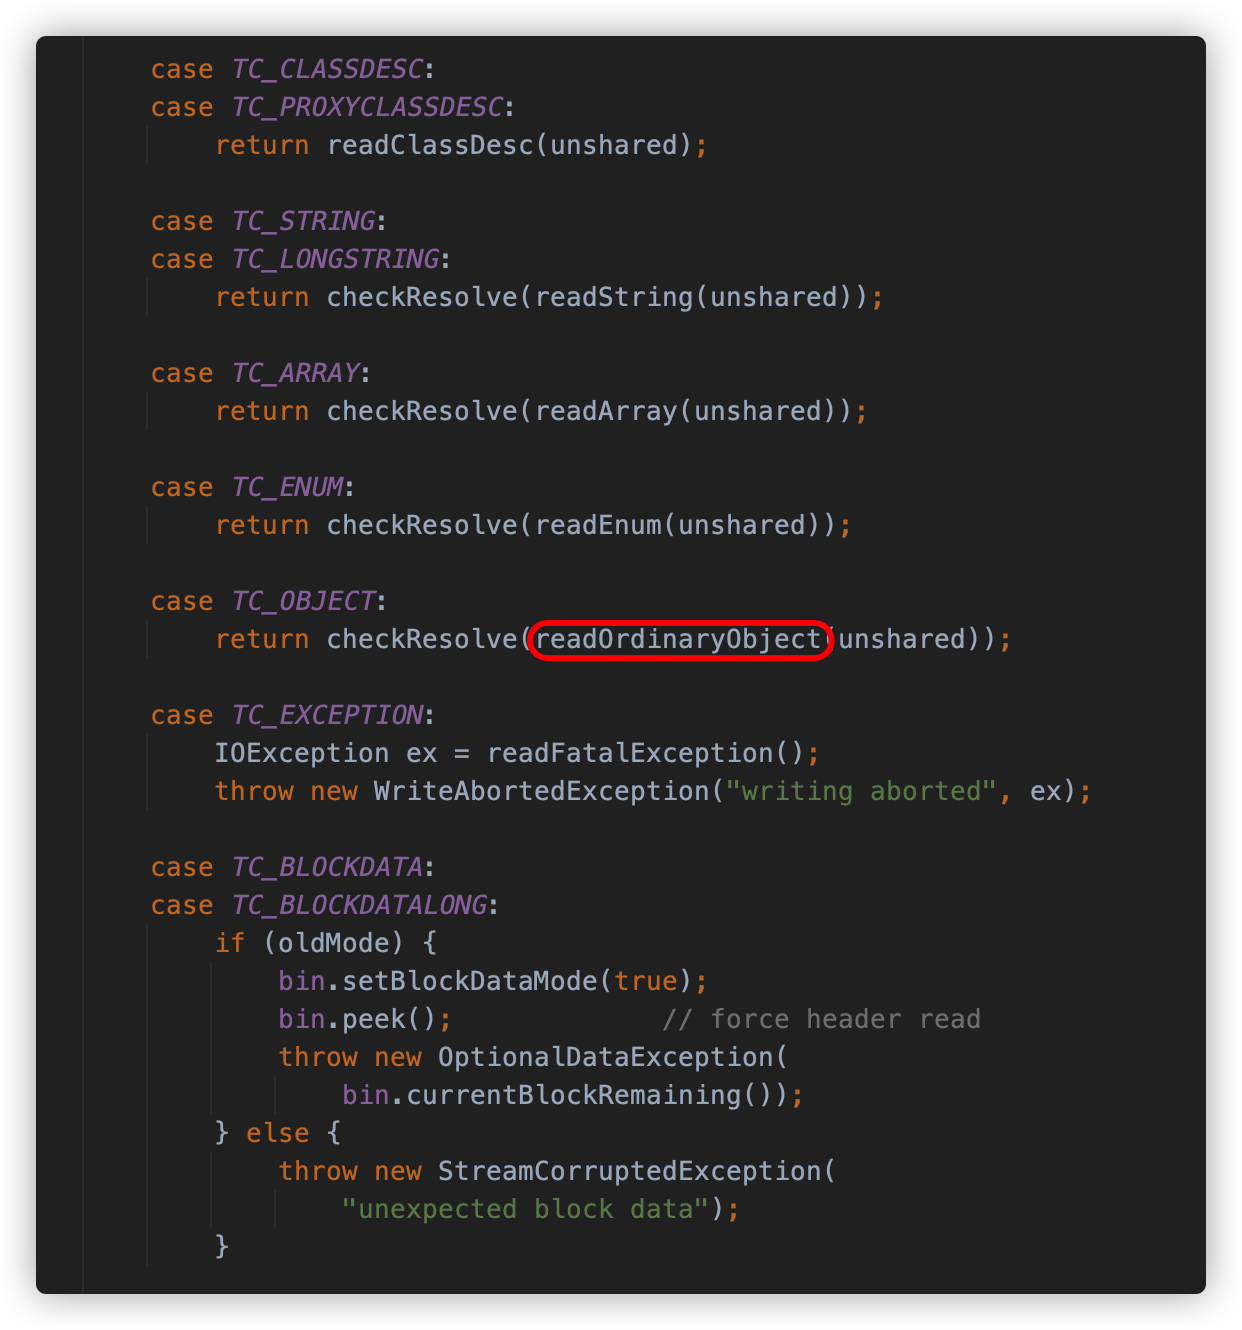
readOrdinaryObject 方法会调用 readClassDesc 方法读取类描述符,并根据其中的内容判断类是否实现了 Externalizable 接口,如果是,则调用 readExternalData 方法去执行反序列化类中的 readExternal,如果不是,则调用 readSerialData 方法去执行类中的 readObject 方法。
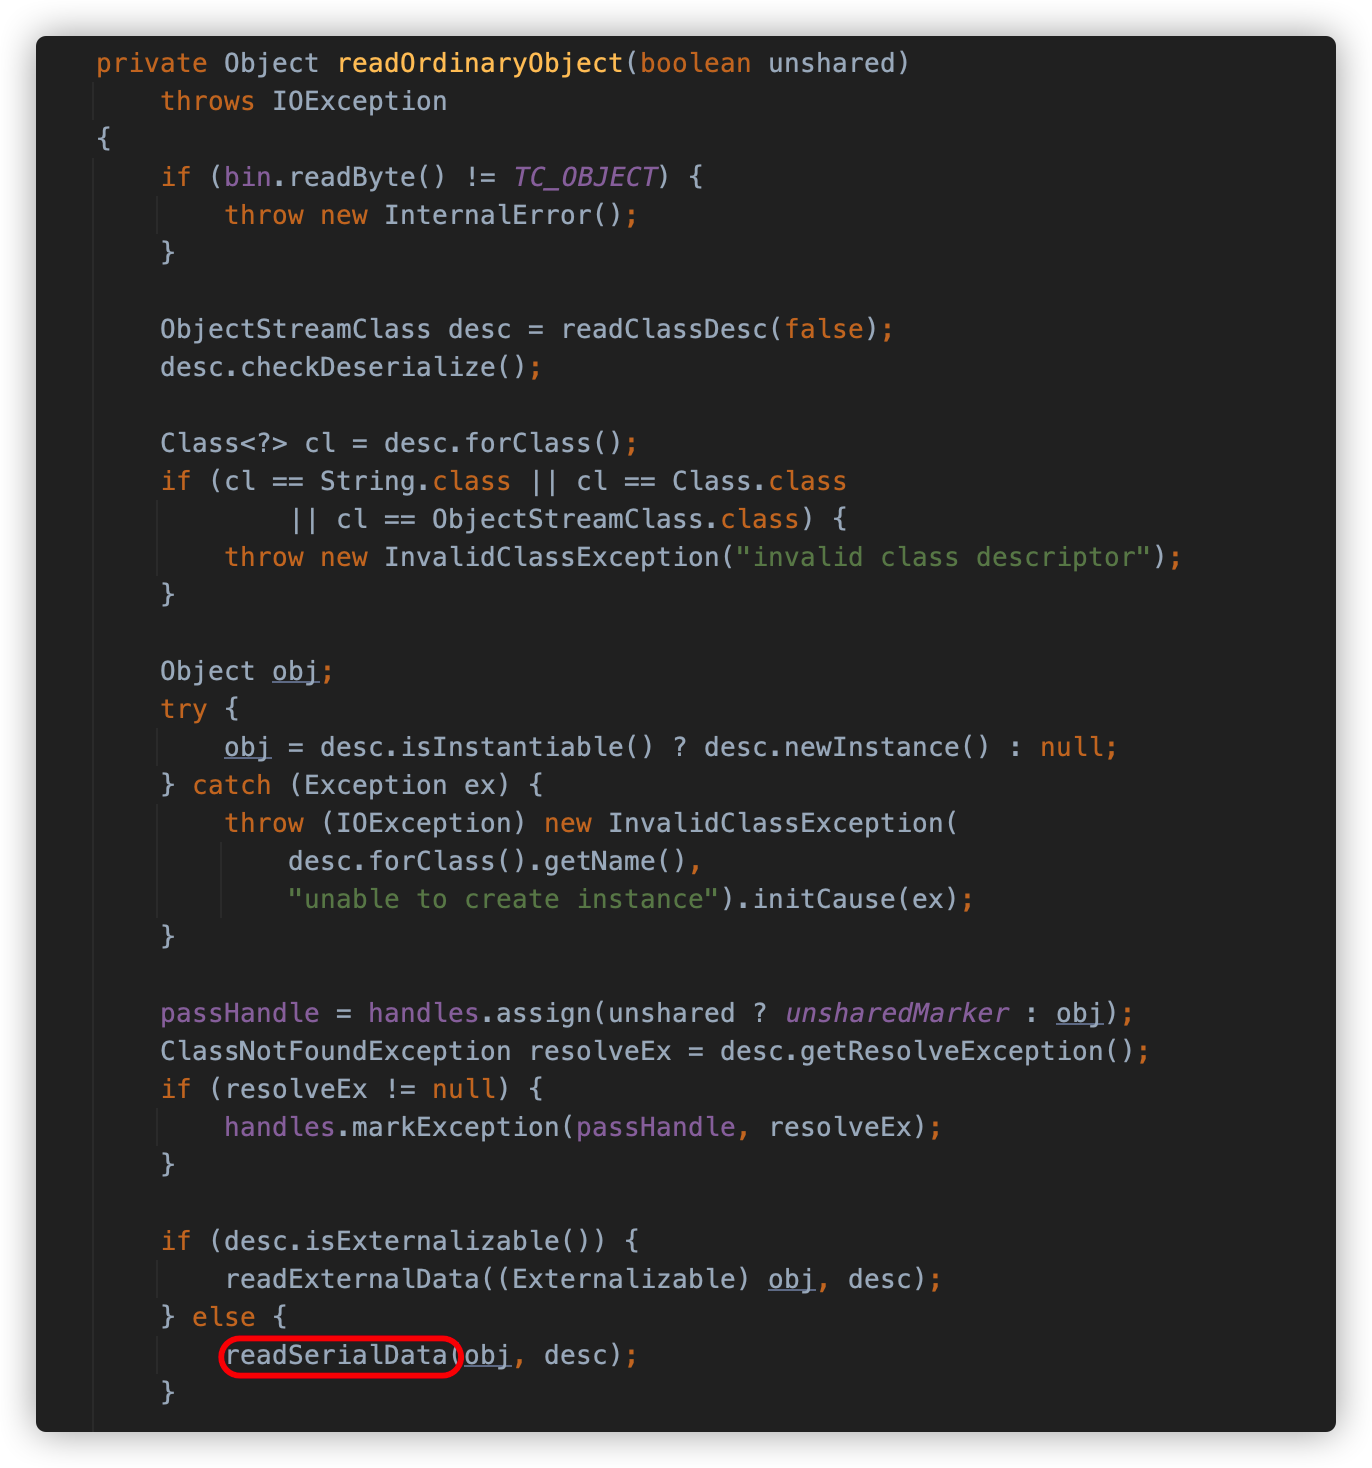
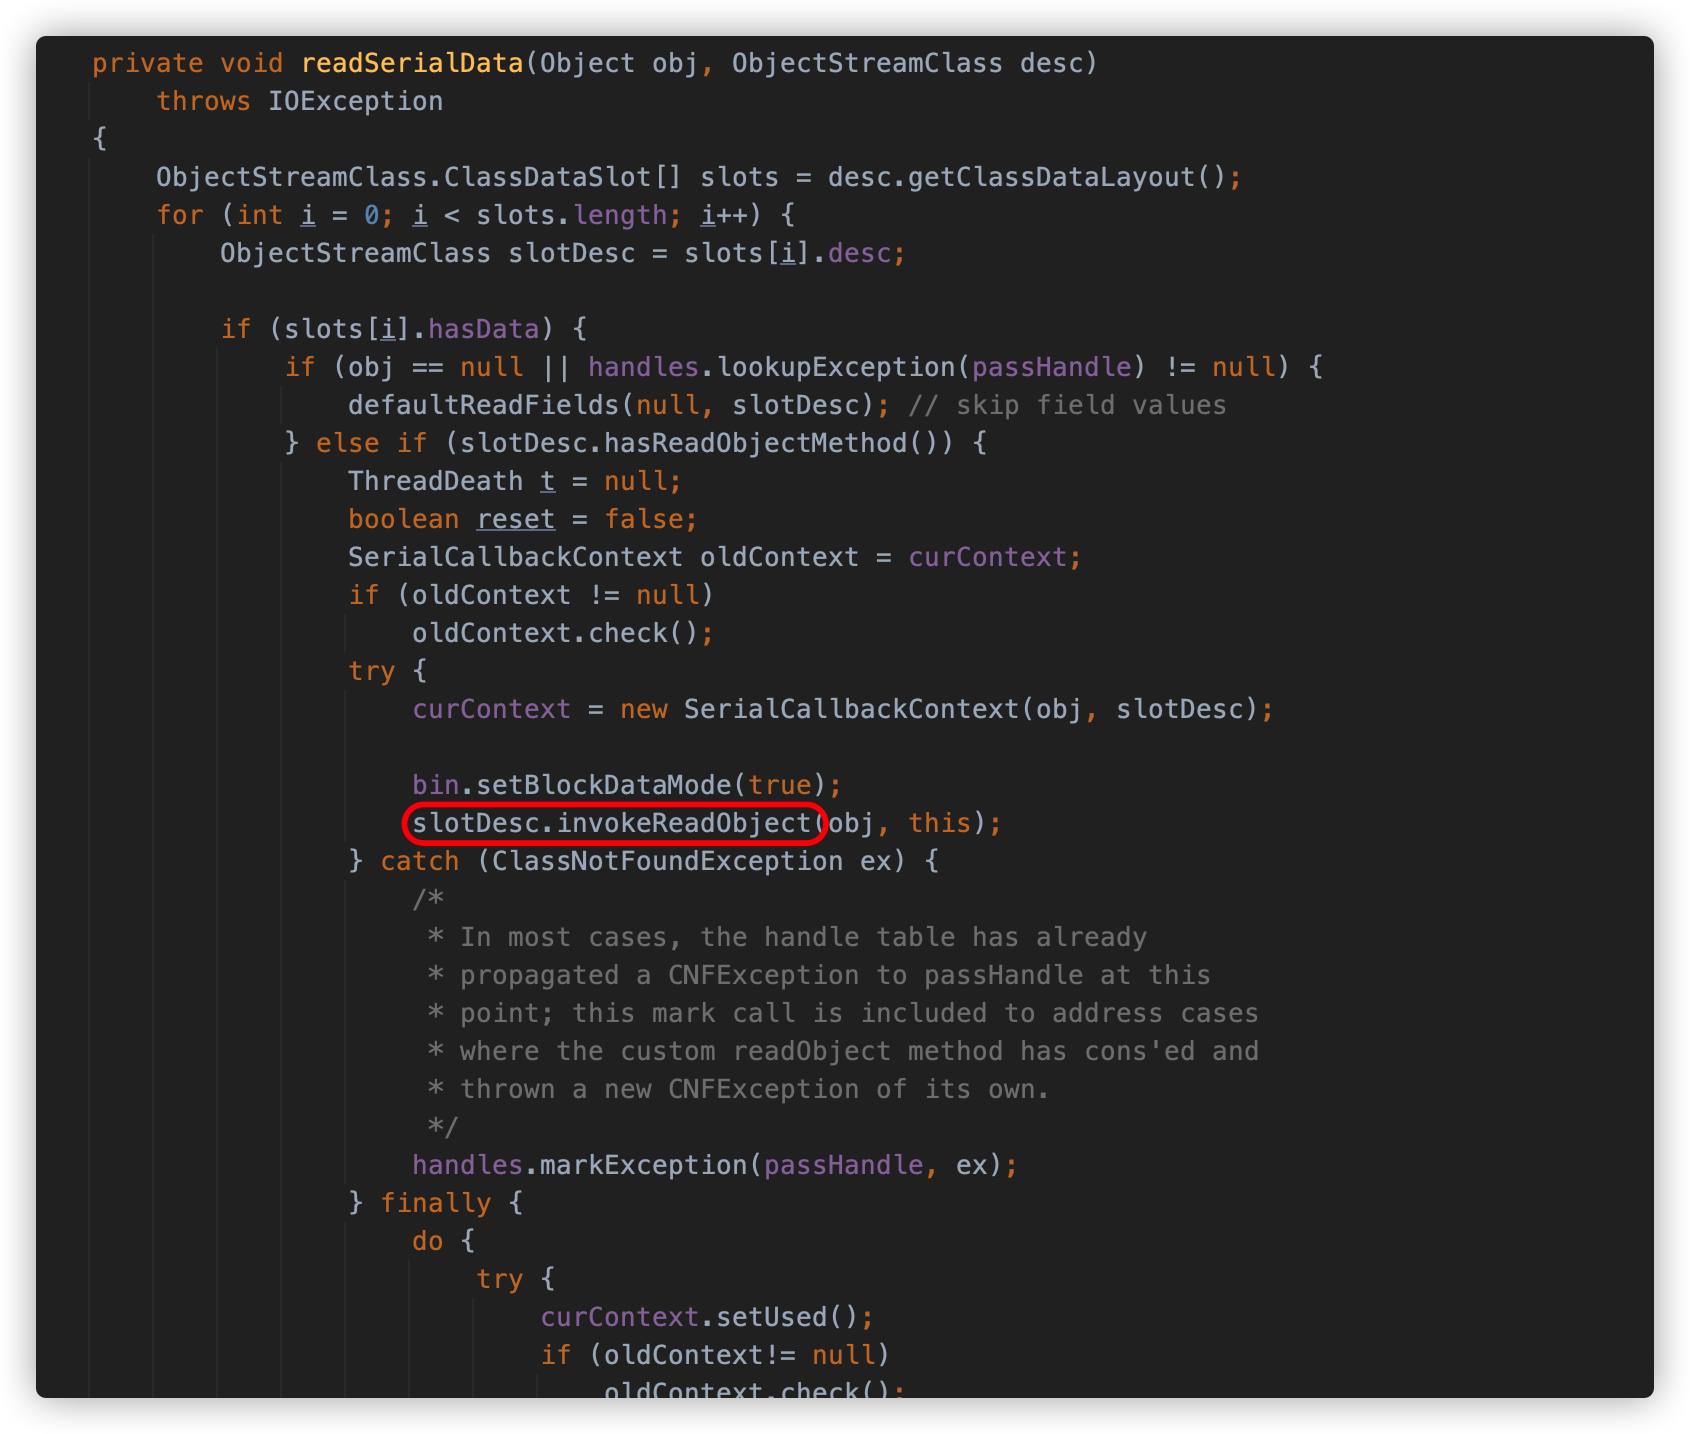
在 readSerialData 方法中,首先通过类描述符获得了序列化对象的数据布局。通过布局的 hasReadObjectMethod 方法判断对象是否有重写 readObject 方法,如果有,则使用 invokeReadObject 方法调用对象中的 readObject 。
- 一个能成功执行的反序列化调用链需要三个元素:“kick-off”、“sink”、“chain”。翻译成中文来说就是 “入口点(重写了 readObject 的类)”、“sink 点(最终执行恶意动作的点:RCE…)”、“chain (中间的调用链)”
URLDNS
好的友子们,咱们开始URLDNS链了哦~~
这是条很适合我们这种新手分析的反序列化链
- 由于URLDNS不需要依赖第三方的包,同时不限制jdk的版本,所以通常用于检测反序列化的点 ,URLDNS并不能执行命令,只能发送DNS请求
先在这里抛出ysoserial中的这条链
1 | package ysoserial.payloads; |
感觉看着很麻烦对吧?
我们先把它改成我们好理解的模式
1 | public class URLDNS { |
你先不需要看懂这些代码,仅仅过一遍有个印象即可,且听我一步一步的分析:
首先,我们上文讲到,触发反序列化的方式是readObject这个方法
在上面代码中,很容易看的出来是把hashMap进行了序列化,然后再进行反序列化
因此我们试着跟进下hashMap看一下它的readObject方法
1 | private void readObject(java.io.ObjectInputStream s) |

可以直接跳过前面的大部分的代码,都是一些初始化。
直接来到最后的这里:
1 | for (int i = 0; i < mappings; i++) { |
这里运用了一个for循环对K和V各自的值进行readObject反序列化,然后再调用了putVal这个函数,里面含有hash对key进行了一次方法。我们跟进hash里面去
1 | static final int hash(Object key) { |

如果 key 为 null, 则值为 0 ,否则将调用 key 的 hashCode 方法计算 hashCode 值,再和位移 16 位的结果进行异或得出 hash 值。
看到了这里似乎好像跟不进去了这个hashCode方法,于是尝试着回到最初的链子,发现了new URL,那我们在跟进URL看看会有什么

URL类里面居然有hashCode这个方法,其实也必然是这样的
因为我们是把url通过了hashMap的put方法放进去的,所以也应该理所当然的调用的是URL下的hashMap
1 | hashMap.put(url, 0); |
接着,我们继续跟进hashCode
1 | private int hashCode = -1; |

不难发现hashCode默认值为-1
如果不为-1,则直接返回当前的hashCode
如果为默认值-1,则会对url进行handler.hashCode这个方法
因此我们继续跟进
1 | protected int hashCode(URL u) { |
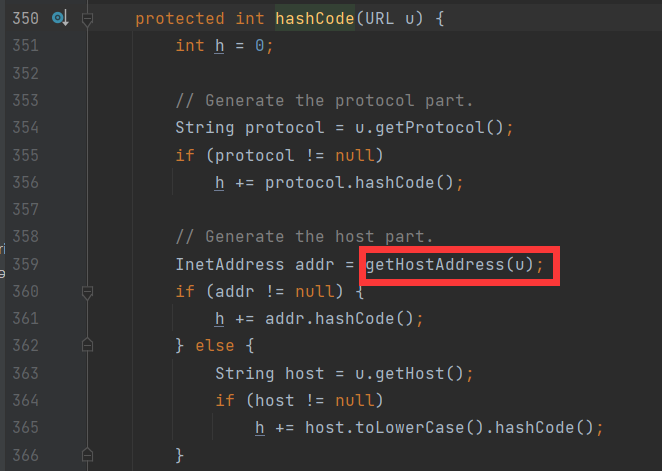
这里首先是getProtocol得到了通信协议
然后来到了getHostAddress,我们继续跟进这个方法,看名字猜测是得到主机的地址
1 | protected synchronized InetAddress getHostAddress(URL u) { |
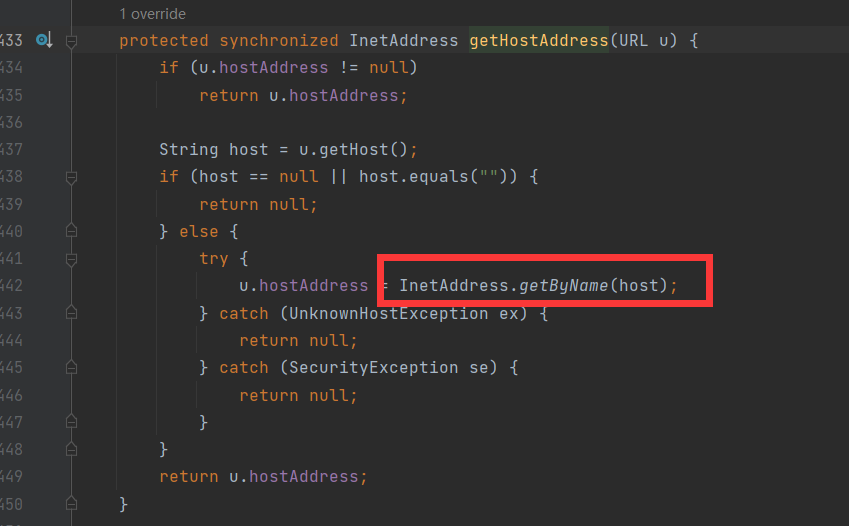
这⾥ InetAddress.getByName(host)的作⽤是根据主机名,获取其IP地址,在⽹络上其实就是⼀次 DNS查询。到这⾥就不必要再跟了。
因此,通过以上的梳理,我们大概的得出来了整个URLDNS 的Gadget其实清晰⼜简单:
- HashMap->readObject()
- HashMap->hash()
- URL->hashCode()
- URLStreamHandler->hashCode()
- URLStreamHandler->getHostAddress()
- InetAddress->getByName()
当我们再回首ysoserial写的时,便对它熟悉了更多
1 | package ysoserial.payloads; |
这里首先new了一个SilentURLStreamHandler(),而SilentURLStreamHandler()又是继承了URLStreamHandler,并且它重写了openConnection 和getHostAddress
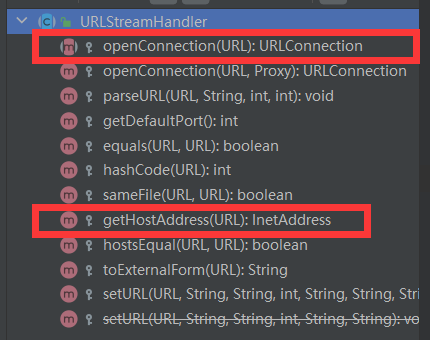
根据JAVA的继承子类的同名方法会覆盖父类方法的原则,这个骚操作的思路大概就是本来执行URLStreamHandler.getHostAddress我们写一个URLStreamHandler的子类SilentURLStreamHandler的getHostAddress,然后啥都不做,这样就不会在生成payload的时候去请求DNS。
回到代码中去,然后new了hashMap和URL,然后再把url这个对象put到hashMap中
我们跟进一下put
1 | public V put(K key, V value) { |
发现它也和上面的hashCode一样,最终也会请求一次DNS,所以代码中的handler就是用来这里不请求DNS,这也是ysoserial的骚姿势吧
那么为什么在反序列化时又可以产生dns查询了呢?是因为这里的handler属性被设置为transient,前面说了被transient修饰的变量无法被序列化,所以最终反序列化读取出来的transient依旧是其初始值,也就是URLStreamHandler。
1 | Since the field <code>java.net.URL.handler</code> is transient, it will not be part of the serialized payload. |
这也就解释了为什么反序列化后获取的handler并不是前面设置的SilentURLStreamHandler了。
在这里我们也可以不用他的骚姿势,不用去定义一个handler,我们可以直接通过反射拿到hashCode然后随便设置一个值让它不等于-1即可,就会绕过去进行DNS请求的方法,然后put进去后再通过反射修改为-1,让最后反序列化时又是-1,进而进行DNS请求。
1 | public class URLDNS { |
以上便是学习的全部过程了!
写的不好的地方希望各位能在评论区及时指出QAQ
参考
https://paper.seebug.org/1242/#urldns
https://www.yuque.com/tianxiadamutou/zcfd4v/fewu54#f3b2a19f
https://www.anquanke.com/post/id/201762#h3-9
<P牛-Java安全漫谈-反序列化篇>
